
Showing posts with label Copics. Show all posts
Showing posts with label Copics. Show all posts
Friday, December 5, 2014
In Full Bloom
Could not get a decent scan on this, to show how pretty it actually is.
In Full Bloom was one of the first Stampin Up sets I bought. I've had so much fun with it. This was made using Wausau Ivory c/s for the base and SU Pretty Pink for the frame. The soft, pretty stripes background was from my extensive computer DSP collection (Filed under Stripes, Flwr 2 - note to self). The leaves were stamped onto a 2 3/4" square of ivory and colored using Copic G21 & YG61. That was affixed to the pink piece. The flower head was stamped onto white and colored using layers of Zig Baby PinkMarker (another first purchase - years ago and it still works). The petals were touched lightly with Stickles Stardust glitter and it has Gold Liquid Pearl centers. It was fussy cut and then attached Flat to the stem, with a dimensional toward the top so part of it stands up off the page. I like that type of effect. The adorable bee was colored with Daffodil Delight and Black, fussy cut and had his wings glitzed. Attached a framed sentiment and you're done.
Monday, November 3, 2014
More Swallowtail Butterflies
I am having just too much fun with this stamp. Have been creating them with different colors and layouts. Not sure I could pick a favorite. Most are glittered but as usual it doesn't show well in a scan.
 These were all stamped on white c/s using Memento Tuxedo Black ink, colored with Copics and run through the Big Shot using the Oval Nesties. A portion of the wings were fussy cut first so that it would appear to be outside of the oval. The Left wind portion and body are glued down, with Dimensionals used under the outer edges of the right wing. Makes for a pretty neat effect. Complimentary colors were sponged onto the white around the butterfly, to better tie the colors together.
Tuesday, October 21, 2014
Violet Coneflowers
Am doing several variations of this image. Here's the first one.

The Coneflower is from an old Gina K set called Heartfelt. It was stamped with Memento Black and colored with Copics (V09, V04, V01, Y17, E35, YG23, YG95). The plain and scalloped circles and ovals were cut with Nestabilities and sponged lightly with inks. A "Score Board" helped with the placement of the lines. Flowers were affixed with Dimensionals and highlighted using Crystal Accents for Dew Drops. I used Wausau c/s in lavender and a darker shade.
Sunday, October 19, 2014
Swallowtail
Caroline, from our stamping group, taught some neat cards using this stamp at class last week. Then she was kind enough to bring it over and allow me to stamp a bajillion more of them to play with. While these are about a million miles from what we started with, these are the first two cards that I have finished.


These were stamped onto ShimmerPaper and embossed with Black EP. They were colored with Copics and/or SU ink pads and Aquapainter. Then fussy cut with the second copy of the wing placed slightly offset from the first one and raised with dimensionals. It barely shows in the scan, but the yellow background has subtle sunflowers in the right hand corner for the butterfly to land on. I used Pumpkin, Regal Rose and Real Red to color the yellow one and used Brilliant Blue and Soft Blue on the second one.
Saturday, August 9, 2014
In Full Bloom again
Found another unfinished project. Love, love, love this retired set. This is done with Barely Banana, Pixie Pink and some old designer paper. Colored with Copics, glittered generously on the flower and on the bees wings. Flower head and bee are fussy cut and attached, no dimensionals this time. This is the only one with a sentiment. For the other ones I have simply stamped an assortment of sentiments and have them ready to put in place once I decide how the card will be used.

Wednesday, June 18, 2014
Greg's Birthday
Hard to believe my baby boy is turning 53 - yikes! He loves the outdoors, hunting and fishing, so it is always fun to make his cards.

This card was created using Flourish Co. What a Catch digi set. I colored with Copics and sponged in a light blue chalk background. No matter how many Dies I buy, I always go back to my trustee Creative Memories Oval Cutting system - such a shame they went out of business. I used SU Gorgeous Grunge to apply the speckling around the front of the card. The fish and lures stamped on the green are from an assortment of different fishing type sets. Several years ago Greg had the opportunity to actually watch me take a plain white piece of paper and turn it into something, with lots of different layers of color, etc., and said he now had a whole new appreciation of the cards he receives. So I know that he will enjoy this one. Happy Birthday Greg!
Thursday, April 24, 2014
More Graduation - Outside the Box!
As you know, I had Jessica's card all finished, sealed, stamped, ready to go, and then.....I saw these adorable Box Cards and just had to try one (or more - since Garon graduates from college next month too). These aren't really as difficult as I expected. There are a number of good tutorials available on the web. These are created with a combination of stamps and digi images. The inspiration came from Laura Lipe who has an adorable one on her Pinterest page. Thanks everybody for your assistance and encouragement!


Sunday, April 20, 2014
Birthday Candles
Many years ago, they created a wonderful thing called a Big Shot Machine. With this machine and some Cuttlebug Embossing Folders, you could imprint raised decorations on your card stock. We borrowed the machine, thinking we would never own such a wondrous invention (and that was how many machines ago?), and some folders and embossed an entire shoe box full of card stock quarter panels. How fun. I came across this box the other day and decided I'd best do something with some of the embossed pieces and since I was in need of some birthday cards, I started there. I printed out some Digi candle images, colored them with Copics and cut them out. I rubbed a stamp pad lightly over the embossed c/s, to enhance the design a little. Attach the candles with dimensions and mount onto a finished card. An attractive, fun, easy card. Enjoy

Saturday, September 7, 2013
Garden Collage again - the other 3 designs
OK, here are the three other cards that I had failed to post, then no more Garden Collage for a while, I promise.
This one is almost 'electric' with it's bright blue and nearly florescent green papers and embellished with the 'blue diamonds'. How cheery.

This next one is on a white background, honest. Have no idea why it scanned gray. Embellished with tiny blue ribbon and the added bird again. Doesn't show well in scans, but bird and butterfly are lightly glittered

This last one is done in the 'Zindorf' style. Michelle Zindorf does the most beautiful work and travels the US teaching her style.

Hope you enjoyed seeing the variety available with a single stamp.
Thursday, September 5, 2013
More Garden Collage (Retired SU set)
I think this is the 5th design I've done with this set recently. Guess I need to scan and post a couple of the others yet. On both cards, the center design piece is raised above the rest of the card. On one of them, there is truly a white border. On the other, the black goes all the way to the edge. I think it's a little confusing when looking at the photos. Enjoy.
This is the one that has the white border:


This is the one that has the white border:


Tuesday, December 4, 2012
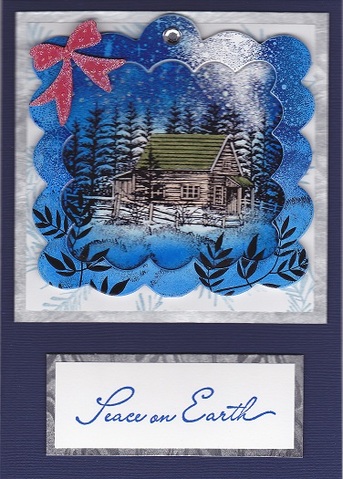
Christmas Stampscape Class
Have been trying to get into this class for the past two years. So happy I finally got in, now I just have to put what I learned to good use. These are the three cards that we made in class. I especially like the ornament shape cut-out. Bought 2 sets of ornament Dies last year and don't think any are this big. Pretty simple really. Use your BigShot & your Die to cut the desired shape into your basic card stock. Using the shape as a guide, build your scene on glossy paper. Color it with Memento, and/or Markers. Add little embellishments such as the bow, ribbon, angel or presents and mount onto cardstocks. Ken is a great teacher and works magic with the scenescape stamps.


Friday, May 4, 2012
Sending Love through cards
 Our daughter is having major back surgery today. So we are showering her with a card a day for a couple weeks. You may remember when we did this for my dear friend Jean when she had surgery a few years ago. Her cards are posted pretty far back on my blog but you can find them all at once by clicking on Get Well in the catagory column. Anyway, we've sent some of those same card, just personalized them or updated them a little, whatever they needed. Todays card did not scan worth beans, but hopefully you can get a good enough picture of what's going on. This is an adorable girl Doctor, by Mo Manning, about to give her bear a shot. I hope you can read the text - you for sure have to watch out for those Side Effects. Thanks for stopping by, I always enjoy your visit!
 Monday, April 23, 2012
Happy Birthday Jessica

Thursday, April 12, 2012
Garrett's Birthday Card
 My grandson has a birthday this month and I can't be there (MI), but I will be there in June - can hardly wait. This was such a fun card to make with all the special papers and parts. 3 baseballs were Punched out, covered with Crystal Lacquer to make them stand out and be shiny. Same with the glove that had been colored with Copics. Don't think it shows too much in the photo but the shirt, hat, and skin, even the bat, are pretty well shaded and blended if I do say so myself. I'm even happy with the shading on the white pants and the creation of grass and ground. Know he just rips it open looking for the $$$, but I have fun anyway. It's great to make a labor of love for somebody special. Thanks for stopping by.
Friday, November 25, 2011
Anyone have Teen Age boys?

This guy was a MO digi. I did two of them but already sent the blue one to my teenage grandson and failed to grab a picture of it. I thought the brown tones and geometrics really went together well and were very masculine. He is colored with Copics. I cut him with a rectangular Nestie, leaving the front end of the skateboard outside of the rectangle. The white around the boy was sponged using Soft Suede to make it not so stark. The skateboard has Crystal Lacquer for sheen and the front of it is popped up. Pretty sharp if I do say so myself. Enjoy
Wednesday, July 14, 2010
Aloha...
 This is a free Digi image given out by Michelle Perkett for a challenge to be done later. I am going to try to list all my Copic Colors for the first time so please bear with me. Skin: E31, E33. Flowers RV21, RV34 and Y17. Hair C1, C3, C5, C7 and a touch of BV29. The skirt was G14, G05 and G17. The Yuke was Y28 and Y08. The background was all sponged in and an assortment of other stamps were used to complete the scene.
Subscribe to:
Posts (Atom)